Showing posts with label Mysql. Show all posts

Sunday, 14 January 2024

Database Basics: CRUD Operations for Beginners

🚀 Level Up Your Coding Skills!

Get the latest tutorials on Java, MySQL, and Modern Tech delivered straight to you.

SUBSCRIBE TO RAM N JAVA

Understanding CRUD: The Foundation of Every Database

If you are a beginner in the world of programming, you might keep hearing the word "CRUD." It sounds complicated, but it is actually the simplest and most important concept you will ever learn for managing data in a database like MySQL.

What Does CRUD Stand For?

CRUD is an acronym for the four basic things you can do with data. Imagine you are managing a list of users in a MySQL database:

  • CREATE: This is when you add a new entry. In SQL, we use the INSERT command to add a new person to our list.
  • READ: This is when you want to look at the data. We use the SELECT command to view who is in our database.
  • UPDATE: This is when you need to change something. If a user changes their phone number, we use the UPDATE command to fix it.
  • DELETE: This is when you remove data. If a user leaves, we use the DELETE command to take them off the list.

Why Is It So Important?

Almost every app you use today—Facebook, Amazon, or even your bank—is built on these four operations. Whether you are posting a status (Create) or deleting an old photo (Delete), you are performing CRUD!

Summary for Beginners

Don't let the technical terms scare you. Once you understand that every app is just a way to Create, Read, Update, and Delete data, coding becomes much easier to visualize. In the video above, I break down exactly how this works so you can start building your own database projects.


Hand-Picked MySQL Tutorials for You:

Friday, 6 May 2022

How To Install MariaDB on Amazon EC2 Linux Server? | MariaDB Installation Linux | AWS EC2 Tutorial

🔥 Want to Master AWS & Java?

Subscribe to Ram N Java for more easy-to-follow technical tutorials!

SUBSCRIBE ON YOUTUBE

Introduction

MariaDB is one of the most popular open-source relational databases. In this guide, we will walk through the entire process of installing MariaDB on an Amazon EC2 Linux instance and show you how to set up a secure root password.

Step 1: Install MariaDB

First, connect to your EC2 instance via SSH. To check for available MariaDB packages and install the server, run these commands:

# Check available packages
sudo yum list mariadb*

# Install MariaDB Server
sudo yum install mariadb-server

Step 2: Start and Enable the Service

After installation, you need to start the MariaDB service and enable it so that it starts automatically when the server boots up.

# Start MariaDB
sudo systemctl start mariadb

# Enable MariaDB to start on boot
sudo systemctl enable mariadb

Step 3: Setting the Root Password

By default, MariaDB installs without a root password. To set a new password, follow these specialized steps:

  1. Stop the service: sudo systemctl stop mariadb
  2. Start in safe mode: sudo mysqld_safe --skip-grant-tables &
  3. Log in without a password: mysql -u root
  4. Update the password:
    UPDATE mysql.user SET password=PASSWORD('your_new_password') WHERE User='root';
    FLUSH PRIVILEGES;
    exit;

Step 4: Verify the Installation

Restart the service normally and log in using your new password:

# Log in with password
mysql -u root -p

# Once logged in, show databases
SHOW DATABASES;

Conclusion

You have successfully installed MariaDB on your AWS EC2 instance! You now have a robust database ready to power your applications. Stay tuned for more tutorials on how to connect your Java applications to this database.

Monday, 23 March 2020

Spring Boot - Building Restful Web Services With Jersey (JSON) + JPA | Spring Boot Jersey Example

🚀 Build Modern APIs!

Subscribe to Ram N Java for simplified Java, Spring Boot, and REST API tutorials!

SUBSCRIBE TO OUR CHANNEL

Spring Boot + Jersey + JPA: JSON RESTful Services

Developing high-performance APIs requires a solid understanding of how different frameworks interact. In this tutorial, we "simplify" building JSON-based RESTful services by integrating Spring Boot with the Jersey framework and Spring Data JPA.

Full CRUD Implementation

We walk through a complete Employee Management system, showing you how to handle every major HTTP operation using Jersey (JAX-RS) annotations:

  • POST: Creating new employees by consuming JSON payloads.
  • PUT: Updating existing records using path parameters and JSON data.
  • GET: Retrieving single records or a full list of employees in JSON format.
  • DELETE: Removing records from the database and handling "Not Found" scenarios with proper status codes.

The Tech Stack

See how MySQL serves as our persistent storage, while Spring Data JPA handles the heavy lifting of database operations. We demonstrate the configuration of ResourceConfig to register Jersey resources and how to test everything using the Postman client.

Why Jersey?

While Spring MVC is popular, many enterprise environments prefer Jersey as the standard JAX-RS implementation. Learning how to leverage Jersey within a Spring Boot application gives you the flexibility to work across diverse project architectures. This is an essential skill for any serious Java Backend Developer.

📥 Download the Source Code!

The full Java source code for this project is available! You can find the direct download links in the YouTube video description above to start building.

Spring Boot With Spring Data JPA [Book] | Spring Boot CRUD Example with RESTful APIs and JPA

🚀 Build Real-World Applications!

Subscribe to Ram N Java for simplified Java, Spring Boot, and JPA tutorials!

SUBSCRIBE TO OUR CHANNEL

Spring Boot CRUD & JPA: The Book Management Guide

Developing a robust data-driven application is a fundamental skill for any backend developer. In this tutorial, we "simplify" how to create a complete Book Management System using Spring Boot and Spring Data JPA.

Building the CRUD Architecture

We walk through the entire lifecycle of a RESTful application, showing you how to handle data with ease:

  • POST (Create): How to save new book entries into the database using @PostMapping.
  • GET (Read): Retrieving a single book by ID or listing all available books in the library.
  • PUT (Update): Seamlessly updating book details like title or author.
  • DELETE (Delete): Removing books from the persistent store with proper feedback.

Database Mastery with JPA

Learn how Spring Data JPA eliminates the need for boilerplate SQL code. We demonstrate how to define your Book entity, set up the repository interface, and let Spring handle the database interactions automatically. This approach ensures your application is clean, maintainable, and scalable.

Why This Guide?

A "Book Management" example is the perfect way to understand the core principles of RESTful Web Services. By the end of this tutorial, you'll have a clear understanding of how to connect a frontend to a Spring Boot backend, making it a vital addition to your Java Developer toolkit.

📥 Get the Full Source Code!

The complete Java source code for this Book CRUD project is available! You can find the direct download links in the YouTube video description above to get started.

Sunday, 23 February 2020

Spring Boot With Spring Data JPA | Spring Boot CRUD Example with RESTful APIs and JPA

🚀 Build Scalable Backends!

Subscribe to Ram N Java for simplified Java, Spring Boot, and JPA tutorials!

SUBSCRIBE TO OUR CHANNEL

CRUD Mastery with Spring Boot & JPA

Managing data efficiently is the core of every modern application. In this tutorial, we "simplify" how to implement full CRUD (Create, Read, Update, Delete) operations using the power of Spring Boot and Spring Data JPA.

The JPA Advantage

Forget about writing complex SQL queries for basic operations. We show you how Spring Data JPA handles the heavy lifting, allowing you to focus on your business logic:

  • Repository Pattern: Learn how to create simple interfaces that provide out-of-the-box data access methods.
  • Entity Mapping: Using JPA annotations to link your Java classes directly to your database tables.
  • Service Layer: Implementing a clean service layer to manage transactions and data flow.

Practical CRUD Implementation

We walk through a real-world example, demonstrating each HTTP method and its corresponding database action:

  • POST: Creating and saving new records.
  • GET: Retrieving data by ID or as a complete list.
  • PUT: Updating existing records with ease.
  • DELETE: Efficiently removing data from your system.

Why Master This Stack?

Spring Boot and JPA are the industry standard for Java backend development. Mastering this combination ensures your applications are scalable, maintainable, and robust. Whether you're a beginner or looking to sharpen your skills, this guide is an essential step in your journey as a Java Developer.

📥 Download the Source Code!

The complete Java source code and PowerPoint presentation for this CRUD tutorial are available! Check out the download links in the YouTube video description above to follow along.

Saturday, 8 February 2020

Spring Boot CRUD Operations Example with Exception Handling | Spring boot RESTFul web services

🚀 Master Backend Development!

Subscribe to Ram N Java for simplified Java, Spring Boot, and REST API tutorials!

SUBSCRIBE TO OUR CHANNEL

Spring Boot CRUD & Exception Handling

Building a RESTful service involves more than just data storage; it's about creating a robust system that handles errors gracefully. In this tutorial, we "simplify" the creation of an Employee Management System using Spring Boot, covering full CRUD operations and Exception Handling.

Complete CRUD Implementation

Watch as we build and test each endpoint using Postman, demonstrating how the backend interacts with the database for every major operation:

  • POST: Creating new employees with JSON payloads.
  • PUT: Updating existing employee details via path variables.
  • GET: Retrieving specific employees or a complete list of records.
  • DELETE: Removing records and observing the impact on the database.

Graceful Exception Handling

One of the most important aspects of professional API development is how your service responds when things go wrong. We demonstrate how to catch and handle an EmployeeNotFoundException. Instead of a messy stack trace, you'll see how to return a clean, user-friendly message when a requested ID doesn't exist.

Why This Tutorial is Essential

Mastering CRUD combined with Exception Handling sets the foundation for production-ready applications. By following this guide, you'll learn how to structure your controllers, manage data flow, and ensure your Spring Boot services are both functional and reliable. This is a must-have skill for any Java Developer.

📥 Get the Full Source Code!

The complete Java source code for this Employee Management project is available! You can find the direct download links in the YouTube video description above to follow along.

Saturday, 1 February 2020

How to get an employee using Spring boot layered architecture and JdbcTemplate?

🚀 Loved this tutorial? Subscribe to Ram N Java for more easy-to-follow coding guides! 🌟

Understanding Layered Architecture in Spring Boot

In this tutorial, we dive into how to retrieve employee records from a database using Spring Boot and JdbcTemplate. The key to building professional applications is a "Layered Architecture," which keeps your code clean and organized. We break it down into three simple parts:

  • Controller Layer: This is the entry point that handles incoming requests (like from Postman).
  • Service Layer: This is where the business logic lives, acting as a bridge between the controller and the data.
  • Repository Layer: This layer talks directly to your database (MySQL) to fetch the actual data.

Step-by-Step Implementation

1. Configuration & Database

We start by setting up our application.properties with the database URL, username, and password. This allows Spring Boot to establish a connection to your MySQL server automatically.

2. The Employee Model

We create a simple Java class called Employee with properties like ID, Name, Age, and Salary. We include getters, setters, and a toString method to make the data easy to work with.

3. Using JdbcTemplate & RowMapper

The JdbcTemplate is a powerful tool that simplifies database operations. We use the queryForObject method to execute a SQL SELECT statement. To map the database rows to our Java Employee object, we implement the RowMapper interface.

4. Testing with Postman

Once the layers are connected, we run the Spring Boot application and use Postman to send a GET request. You'll see the flow of data from the Controller, through the Service, into the Repository, and finally back to you as a clean JSON response!

Watch More Tutorials

Check out these other helpful videos from my channel:

How to update an employee using Spring boot layered architecture and JdbcTemplate?

🚀 Want to master Spring Boot? Subscribe to Ram N Java for more expert coding tutorials! 🌟

Updating Data with Spring Boot & JdbcTemplate

In our previous tutorials, we learned how to retrieve data. Today, we're taking it a step further by learning how to Update records in a MySQL database using Spring Boot and JdbcTemplate. We will continue following the professional Layered Architecture to ensure our code is scalable and easy to maintain.

The Core Concept: Layered Architecture

To keep things simple for beginners, remember that every request flows through these sections:

  • Controller: Handles the web request (the "brain" that receives instructions).
  • Service: Handles the business logic (the "logic" that decides what to do).
  • Repository: Handles the database communication (the "muscles" that do the heavy lifting).

Step-by-Step Implementation

1. Creating the Update Repository Method

In the Repository layer, we use the jdbcTemplate.update() method. This method is used for all "Data Manipulation Language" (DML) operations like INSERT, UPDATE, and DELETE. We write a standard SQL query: UPDATE employee SET name = ?, age = ? WHERE id = ?.

2. Connecting via the Service Layer

The Service layer acts as the middleman. It receives the updated data from the controller and passes it down to the repository. This is where you would typically add any validation or extra logic before saving the data.

3. Exposing the PUT Endpoint

In the Controller, we use the @PutMapping annotation. This tells Spring Boot that this method should handle HTTP PUT requests, which are standard for updating existing resources.

4. Testing with Postman

Once everything is coded, we jump into Postman. We send a JSON body with the new details for an existing employee ID. If everything is correct, the database updates instantly, and we receive a success confirmation!

Explore More Coding Tutorials

Expand your knowledge with these related videos from my channel:

Friday, 17 January 2020

How to create an employee using Spring boot layered architecture and JdbcTemplate?

🚀 Ready to Level Up Your Coding Skills?
Click here to Subscribe to Ram N Java! 🌟 Join our community for more easy-to-understand tutorials!

Mastering Data Creation in Spring Boot

In this tutorial, we explore the fundamental process of adding new data to a database using Spring Boot and JdbcTemplate. Creating records is the first step in any CRUD application, and doing it the right way using Layered Architecture makes your code professional, clean, and extremely easy to debug.

The Power of Layered Architecture

We organize our application into three distinct layers to ensure every part has a specific job:

  • Controller Layer: Receives the data from the user (usually as JSON) via a POST request.
  • Service Layer: Validates the data and coordinates the flow between the controller and the database.
  • Repository Layer: Uses JdbcTemplate to talk to MySQL and save the record securely.

Key Steps in the Tutorial

1. Handling POST Requests

We use the @PostMapping annotation in our Controller. This setup allows the application to accept data sent through the request body, which is the standard way to create new resources in REST APIs.

2. Implementing the Save Method

In the Repository, we utilize the jdbcTemplate.update() method. By passing an SQL INSERT statement and the values from our Employee object, Spring Boot handles the heavy lifting of database connectivity for us.

3. Testing with Postman

Testing is crucial! We walk through how to use Postman to send a JSON payload representing a new employee. You'll see how the application processes the request and returns a successful status once the data is safely stored in MySQL.

Explore More from Ram N Java

Keep learning with these randomly selected tutorials from our channel:

Using JdbcTemplate with Spring Boot and Thymeleaf | Spring Boot Tutorial

🚀 Master Modern Web Development! 🚀
Subscribe to Ram N Java

Dynamic Web Pages with Spring Boot & Thymeleaf

Building a backend is only half the battle; the other half is displaying that data to your users. In this tutorial, we bridge the gap between your database and the browser by integrating Spring Boot, JdbcTemplate, and Thymeleaf.

Key Concepts for Beginners

To make our application work, we focus on how data moves from the database to a visual webpage:

  • Thymeleaf: A modern server-side Java template engine that allows us to create dynamic HTML pages.
  • The Model Object: Think of the "Model" as a container that carries data from your Java code to your HTML page.
  • JdbcTemplate Integration: We use JdbcTemplate to fetch our records and then pass them to Thymeleaf for display.

Step-by-Step Breakdown

1. Setting up the Controller

We update our Controller to return a "View" instead of just raw data. By using the Model parameter, we can "add attributes" (like our list of employees) that Thymeleaf can recognize.

2. Creating the Thymeleaf Template

We create an HTML file in the src/main/resources/templates folder. Using special Thymeleaf attributes like th:each, we can loop through our data and create a table automatically!

3. Viewing the Results

Once the application is running, we simply visit the URL in our browser. Instead of seeing JSON text, we now see a beautifully formatted HTML table populated with real data from our MySQL database.

Discover More Tutorials

Want to see what else you can build? Check out these videos from the channel:

Friday, 29 March 2019

Spring 4 + Hibernate 4 + MySQL 8 + Maven Integration example using XML Configuration

🚀 Level Up Your Java Skills!

Subscribe to Ram N Java for easy-to-understand tutorials on Spring, Hibernate, and more!

CLICK HERE TO SUBSCRIBE

Mastering Spring 4 and Hibernate 4 Integration

Integrating powerful frameworks like Spring and Hibernate is a core skill for any Java developer. In this guide, we walk through a complete example of how to connect these frameworks using MySQL 8 and Maven with a classic XML-based configuration.

1. Why XML Configuration?

While annotations are popular, understanding XML configuration is essential for maintaining legacy systems and understanding how the "magic" happens behind the scenes. It provides a clear, centralized place to manage your beans and database settings.

2. The Role of Maven

Maven acts as your project manager. Instead of manually searching for JAR files, we define our dependencies in the pom.xml. This ensures that Spring, Hibernate, and the MySQL connector all work together seamlessly.

3. Setting Up MySQL 8

MySQL 8 introduced new security and performance features. We'll show you the exact properties you need in your configuration to ensure a stable connection between your Java application and the database.

Key Takeaways for Beginners:

  • How to structure a Maven project.
  • Defining DataSources and SessionFactories in XML.
  • Performing basic CRUD operations.

Spring 4 + Hibernate 4 + MySQL 8 + Maven Integration example using Annotations Configuration

🚀 Master Java Development with Us!

Enjoyed this tutorial? Don't miss out on more deep dives into Spring and Hibernate.

SUBSCRIBE TO RAM N JAVA

Spring 4 and Hibernate 4 Integration Guide

Welcome! In this tutorial, we explore how to integrate Spring 4 with Hibernate 4 using MySQL 8 and Maven. This guide is perfect for beginners who want to understand how these technologies work together using modern annotation-based configurations.

1. Setting Up Your Database

First, we start with a simple Employee table. This table includes essential columns such as:

  • ID: Unique identifier
  • Name: Employee name
  • Joining Date: When the employee started
  • Salary: Compensation details
  • SSN: Social Security Number for identification

2. Project Structure & Dependencies

Using Maven, we manage all necessary dependencies in the pom.xml file. A critical tip: Always ensure your MySQL Connector version is compatible with the MySQL server installed on your machine to avoid connection issues.

3. Configuration Classes

We move away from bulky XML files and use Java Annotations. We create a HibernateConfiguration class where we define:

  • DataSource: Contains the URL, username, and password for your database.
  • SessionFactory: Manages Hibernate sessions.
  • TransactionManager: Handles database transactions smoothly.

4. Performing CRUD Operations

In the tutorial, we demonstrate how to perform the core database actions (CRUD):

  • Create: Saving a new employee record.
  • Read: Fetching all employees or searching by SSN.
  • Update: Modifying existing data (like changing a salary).
  • Delete: Removing records from the table.

Watch and Learn More

Check out these other helpful videos from Ram N Java to keep growing your skills:

Friday, 15 May 2015

JDBC - CallableStatement Multiple In Out Parameters (Mysql)

Click here to watch in Youtube : https://www.youtube.com/watch?v=gOX3kvMKrRs&list=UUhwKlOVR041tngjerWxVccw&index=4

Click the below Image to Enlarge
JDBC - CallableStatement Multiple In Out Parameters (Mysql)
Create Stored Procedure
DELIMITER $$

DROP PROCEDURE IF EXISTS `world`.`getCityInfo` $$
CREATE PROCEDURE `world`.`getCityInfo` 
   (IN CITY_ID_INPUT INT,
    IN CITY_POPULATION_INPUT INT,
    OUT CITY_NAME_OUT VARCHAR(255),
    OUT CITY_COUNTRY_CODE_OUT VARCHAR(255),
    OUT CITY_DISTRICT_OUT  VARCHAR(255),
    OUT CITY_POPULATION_OUT INT(11))
BEGIN
   SELECT Name,CountryCode,District,Population INTO CITY_NAME_OUT,CITY_COUNTRY_CODE_OUT,CITY_DISTRICT_OUT, 
   CITY_POPULATION_OUT
   FROM city
   WHERE ID = CITY_ID_INPUT AND Population > CITY_POPULATION_INPUT;
END $$

DELIMITER ;
Call Stored Procedure
set @CITY_ID_INPUT=1;
set @CITY_POPULATION_INPUT=1000;
call getCityInfo(@CITY_ID_INPUT,@CITY_POPULATION_INPUT,@CITY_NAME_OUT,@CITY_COUNTRY_CODE_OUT,
     @CITY_DISTRICT_OUT,@CITY_POPULATION_OUT);
select @CITY_NAME_OUT,@CITY_COUNTRY_CODE_OUT,@CITY_DISTRICT_OUT,@CITY_POPULATION_OUT;
JDBCCallableStatementDemo.java
import java.sql.CallableStatement;
import java.sql.Connection;
import java.sql.DriverManager;
import java.sql.SQLException;
import java.util.Scanner;

public class JDBCCallableStatementDemo
{
    // JDBC driver name and database URL
    static final String JDBC_DRIVER = "com.mysql.jdbc.Driver";
    static final String DB_URL      = "jdbc:mysql://localhost:3306/world";

    // Database credentials
    static final String USERNAME    = "root";
    static final String PASSWORD    = "root";

    public static void main( String[] args )
    {
        JDBCCallableStatementDemo jdbcCallableStatementDemo = new JDBCCallableStatementDemo();

        Scanner scanner = new Scanner(System.in);
        while( true )
        {
            System.out.print("Enter City Id :");
            int cityId = scanner.nextInt();
            System.out.print("Enter City population :");
            int population = scanner.nextInt();

            if( cityId == 0 && population == 0)
            {
                break;
            }

            jdbcCallableStatementDemo.getCityInfo(cityId,population);

        }
        scanner.close();
    }

    private void getCityInfo( int cityId , int population )
    {
        Connection connection = null;
        CallableStatement callableStatement = null;
        try
        {
            /*
             * Register the JDBC driver in DriverManager
             */

            Class.forName(JDBC_DRIVER);

            /*
             * Establish connection to the Database using DriverManager
             */

            connection = DriverManager
                    .getConnection(DB_URL, USERNAME, PASSWORD);

            String plSql = "{call getCityInfo (?,?,?,?,?,?)}";

            callableStatement = connection.prepareCall(plSql);

            /*
             * Bind IN parameter first, then bind OUT parameters
             */

            callableStatement.setInt(1, cityId);
            callableStatement.setInt(2, population);

            /*           
             * Register OUT Parameters            
             */
            callableStatement.registerOutParameter(3, java.sql.Types.VARCHAR);
            callableStatement.registerOutParameter(4, java.sql.Types.VARCHAR);
            callableStatement.registerOutParameter(5, java.sql.Types.VARCHAR);
            callableStatement.registerOutParameter(6, java.sql.Types.INTEGER);

            /*
             * Use execute method to run the stored procedure.
             */
            callableStatement.execute();

            /*
             * Retrieve cityName,countryCode,district and cityPopulation with getXXX method
             */
            String cityName = callableStatement.getString(3);
            String countryCode = callableStatement.getString(4);
            String district = callableStatement.getString(5);
            int cityPopulation = callableStatement.getInt(6);

            System.out.println("city Name : " + cityName+", countryCode : " +countryCode 
                    +", district : "+district+", population : "+cityPopulation);

        }
        catch( SQLException se )
        {
            se.printStackTrace();
        }
        catch( ClassNotFoundException e )
        {
            e.printStackTrace();
        }
        catch( Exception e )
        {
            e.printStackTrace();
        }
        finally
        {
            /*
             * finally block used to close resources
             */
            try
            {
                if( callableStatement != null )
                {
                    callableStatement.close();
                }
            }
            catch( SQLException sqlException )
            {
                sqlException.printStackTrace();
            }
            try
            {
                if( connection != null )
                {
                    connection.close();
                }
            }
            catch( SQLException sqlException )
            {
                sqlException.printStackTrace();
            }
        }

    }
}

Output
Enter City Id :1
Enter City population :1000
city Name : Kabul, countryCode : AFG, district : Kabol, population : 1780000
Enter City Id :0
Enter City population :0

To Download JDBCCallableStatementDemoMultipleInOutParamsMysqlApp Project Click the below link

https://sites.google.com/site/javaee4321/jdbc/JDBCCallableStatementDemoMultipleInOutParamsMysqlApp.zip?attredirects=0&d=1

See also:
  • All JavaEE Viedos Playlist
  • All JavaEE Viedos
  • All JAVA EE Links
  • Servlets Tutorial
  • All Design Patterns Links
  • JDBC Tutorial
  • Java Collection Framework Tutorial
  • JDBC - CallableStatement (Mysql)

    Click here to watch in Youtube : https://www.youtube.com/watch?v=iC7J6EFhjZQ&list=UUhwKlOVR041tngjerWxVccw&index=5

    Click the below Image to Enlarge
    JDBC - CallableStatement (Mysql)
    JDBC - CallableStatement (Mysql)
    Create Stored Procedure
    USE `world`;
    DROP procedure IF EXISTS `getAllCities`;
    
    DELIMITER $$
    USE `world`$$
    CREATE PROCEDURE `getAllCities` ()
    BEGIN
      select * from city;
    END$$
    
    DELIMITER ;
    
    Call Stored Procedure
    call getAllCities();
    
    JDBCCallableStatementDemo.java
    import java.sql.CallableStatement;
    import java.sql.Connection;
    import java.sql.DriverManager;
    import java.sql.ResultSet;
    import java.sql.SQLException;
    
    public class JDBCCallableStatementDemo
    {
        // JDBC driver name and database URL
        static final String JDBC_DRIVER = "com.mysql.jdbc.Driver";
        static final String DB_URL = "jdbc:mysql://localhost:3306/world";
    
        // Database credentials
        static final String USERNAME = "root";
        static final String PASSWORD = "root";
    
        public static void main(String[] args)
        {
            JDBCCallableStatementDemo jdbcCallableStatementDemo = new JDBCCallableStatementDemo();
    
            jdbcCallableStatementDemo.getAllCitiesInfo();
    
        }
    
        private void getAllCitiesInfo()
        {
            Connection connection = null;
            CallableStatement callableStatement = null;
            try
            {
                /*
                 * Register the JDBC driver in DriverManager
                 */
    
                Class.forName(JDBC_DRIVER);
    
                /*
                 * Establish connection to the Database using DriverManager
                 */
    
                connection = DriverManager
                        .getConnection(DB_URL, USERNAME, PASSWORD);
    
                String plSql = "{call getAllCities()}";
    
                /*
                 * Creates a CallableStatement object for calling database stored
                 * procedures. The CallableStatement object provides methods for
                 * setting up its IN and OUT parameters, and methods for executing
                 * the call to a stored procedure.
                 */
    
                callableStatement = connection.prepareCall(plSql);
                
                /*
                 * Use execute method to run the stored procedure.
                 */
                ResultSet rs = callableStatement.executeQuery();
    
                while (rs.next())
                {
                    int id = rs.getInt(1);
                    String name = rs.getString(2);
                    String countryCode = rs.getString(3);
                    String district = rs.getString(4);
                    int population = rs.getInt(5);
    
                    /*
                     * Display values
                     */
                    System.out.print("ID: " + id);
                    System.out.print(", Name: " + name);
                    System.out.print(", CountryCode: " + countryCode);
                    System.out.print(", District: " + district);
                    System.out.println(", Population: " + population);
                }
    
            }
            catch (SQLException se)
            {
                se.printStackTrace();
            }
            catch (ClassNotFoundException e)
            {
                e.printStackTrace();
            }
            catch (Exception e)
            {
                e.printStackTrace();
            }
            finally
            {
                /*
                 * finally block used to close resources
                 */
                try
                {
                    if (callableStatement != null)
                    {
                        callableStatement.close();
                    }
                }
                catch (SQLException sqlException)
                {
                    sqlException.printStackTrace();
                }
                try
                {
                    if (connection != null)
                    {
                        connection.close();
                    }
                }
                catch (SQLException sqlException)
                {
                    sqlException.printStackTrace();
                }
            }
    
        }
    }
    
    
    Output
    ID: 1, Name: Kabul, CountryCode: AFG, District: Kabol, Population: 1780000
    ID: 2, Name: Qandahar, CountryCode: AFG, District: Qandahar, Population: 237500
    ID: 3, Name: Herat, CountryCode: AFG, District: Herat, Population: 186800
    ID: 4, Name: Mazar-e-Sharif, CountryCode: AFG, District: Balkh, Population: 127800
    ID: 5, Name: Amsterdam, CountryCode: NLD, District: Noord-Holland, Population: 50000
    ID: 6, Name: Rotterdam, CountryCode: NLD, District: Zuid-Holland, Population: 4000
    ID: 7, Name: Haag, CountryCode: NLD, District: Zuid-Holland, Population: 440900
    ID: 8, Name: Utrecht, CountryCode: NLD, District: Utrecht, Population: 234323
    ....
    ....
    
    To Download JDBCCallableStatementDemoMysqlApp Project Click the below link

    https://sites.google.com/site/javaee4321/jdbc/JDBCCallableStatementDemoMysqlApp.zip?attredirects=0&d=1

    See also:
  • All JavaEE Viedos Playlist
  • All JavaEE Viedos
  • All JAVA EE Links
  • Servlets Tutorial
  • All Design Patterns Links
  • JDBC Tutorial
  • Java Collection Framework Tutorial
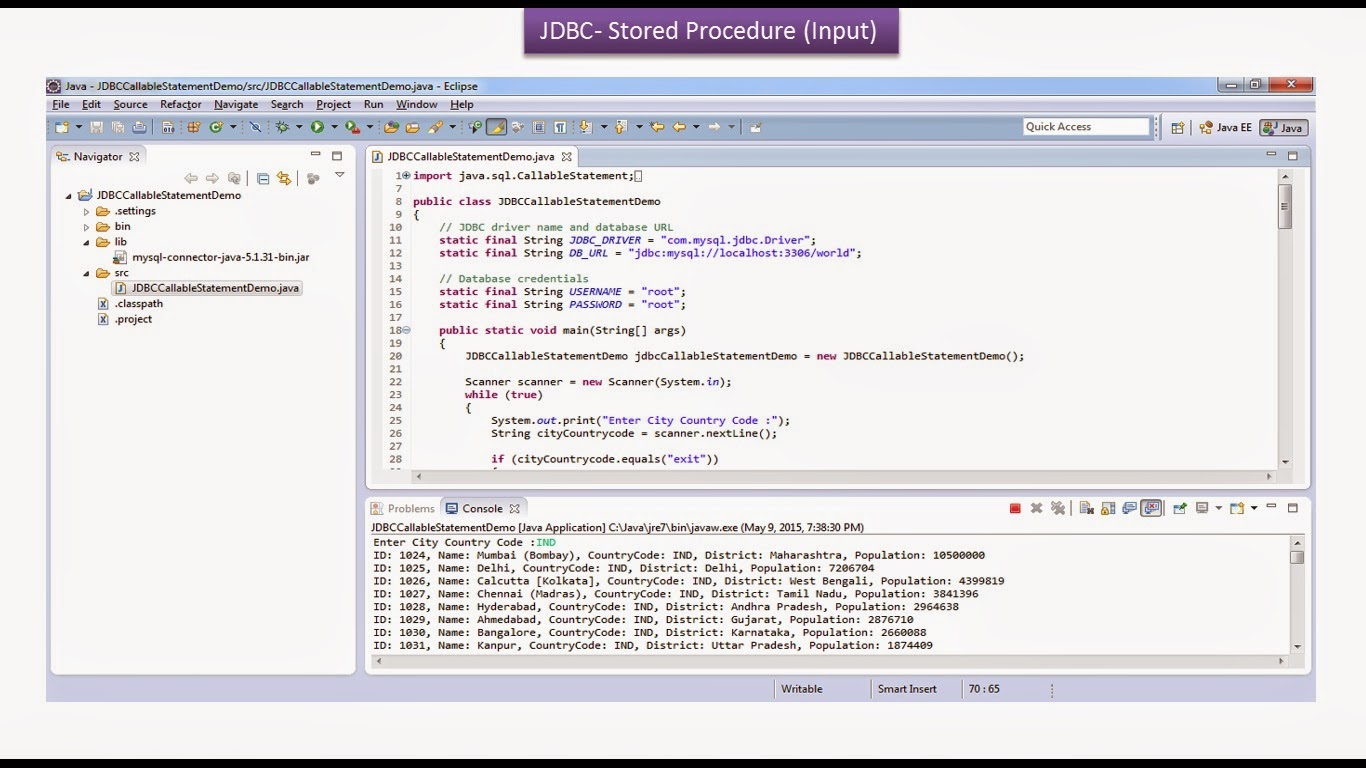
  • JDBC - CallableStatement with Input Parameter(Mysql)

    Click here to watch in Youtube : https://www.youtube.com/watch?v=PN6UVKjACac&list=UUhwKlOVR041tngjerWxVccw&index=6

    Click the below Image to Enlarge
    JDBC - CallableStatement with Input Parameter(Mysql)
    JDBC - CallableStatement with Input Parameter(Mysql)
    Create Stored Procedure
    DELIMITER $$
     
    CREATE PROCEDURE world.getCitiesBasedOnCountryCode (IN CITY_COUNTRY_CODE_INPUT CHAR(35))
    
    BEGIN
      
      SELECT * from city where CountryCode=CITY_COUNTRY_CODE_INPUT;      
     
    END$$
     
    DELIMITER ;
    
    
    Call Stored Procedure
    CALL `getCitiesBasedOnCountryCode`('IND');
    
    CALL `getCitiesBasedOnCountryCode`('PAK');
    
    JDBCCallableStatementDemo.java
    import java.sql.CallableStatement;
    import java.sql.Connection;
    import java.sql.DriverManager;
    import java.sql.ResultSet;
    import java.sql.SQLException;
    import java.util.Scanner;
    
    public class JDBCCallableStatementDemo
    {
        // JDBC driver name and database URL
        static final String JDBC_DRIVER = "com.mysql.jdbc.Driver";
        static final String DB_URL = "jdbc:mysql://localhost:3306/world";
    
        // Database credentials
        static final String USERNAME = "root";
        static final String PASSWORD = "root";
    
        public static void main(String[] args)
        {
            JDBCCallableStatementDemo jdbcCallableStatementDemo = new JDBCCallableStatementDemo();
    
            Scanner scanner = new Scanner(System.in);
            while (true)
            {
                System.out.print("Enter City Country Code :");
                String cityCountrycode = scanner.nextLine();
    
                if (cityCountrycode.equals("exit"))
                {
                    break;
                }
    
                jdbcCallableStatementDemo.getCitiesInfo(cityCountrycode);
    
            }
            scanner.close();
        }
    
        private void getCitiesInfo(String cityCountrycode)
        {
            Connection connection = null;
            CallableStatement callableStatement = null;
            try
            {
                /*
                 * Register the JDBC driver in DriverManager
                 */
    
                Class.forName(JDBC_DRIVER);
    
                /*
                 * Establish connection to the Database using DriverManager
                 */
    
                connection = DriverManager
                        .getConnection(DB_URL, USERNAME, PASSWORD);
    
                String plSql = "{call getCitiesBasedOnCountryCode(?)}";
    
                /*
                 * Creates a CallableStatement object for calling database stored
                 * procedures. The CallableStatement object provides methods for
                 * setting up its IN and OUT parameters, and methods for executing
                 * the call to a stored procedure.
                 */
    
                callableStatement = connection.prepareCall(plSql);
    
                /*
                 * Bind IN parameter first, then bind OUT parameters
                 */
    
                callableStatement.setString(1, cityCountrycode);
    
                /*
                 * Use execute method to run the stored procedure.
                 */
                ResultSet rs = callableStatement.executeQuery();
    
                while (rs.next())
                {
                    int id = rs.getInt(1);
                    String name = rs.getString(2);
                    String countryCode = rs.getString(3);
                    String district = rs.getString(4);
                    int population = rs.getInt(5);
    
                    /*
                     * Display values
                     */
                    System.out.print("ID: " + id);
                    System.out.print(", Name: " + name);
                    System.out.print(", CountryCode: " + countryCode);
                    System.out.print(", District: " + district);
                    System.out.println(", Population: " + population);
                }
    
            }
            catch (SQLException se)
            {
                se.printStackTrace();
            }
            catch (ClassNotFoundException e)
            {
                e.printStackTrace();
            }
            catch (Exception e)
            {
                e.printStackTrace();
            }
            finally
            {
                /*
                 * finally block used to close resources
                 */
                try
                {
                    if (callableStatement != null)
                    {
                        callableStatement.close();
                    }
                }
                catch (SQLException sqlException)
                {
                    sqlException.printStackTrace();
                }
                try
                {
                    if (connection != null)
                    {
                        connection.close();
                    }
                }
                catch (SQLException sqlException)
                {
                    sqlException.printStackTrace();
                }
            }
    
        }
    }
    
    
    Output
    Enter City Country Code :IND
    ID: 1024, Name: Mumbai (Bombay), CountryCode: IND, District: Maharashtra, Population: 10500000
    ID: 1025, Name: Delhi, CountryCode: IND, District: Delhi, Population: 7206704
    ID: 1026, Name: Calcutta [Kolkata], CountryCode: IND, District: West Bengali, Population: 4399819
    ID: 1027, Name: Chennai (Madras), CountryCode: IND, District: Tamil Nadu, Population: 3841396
    ID: 1028, Name: Hyderabad, CountryCode: IND, District: Andhra Pradesh, Population: 2964638
    ID: 1029, Name: Ahmedabad, CountryCode: IND, District: Gujarat, Population: 2876710
    ID: 1030, Name: Bangalore, CountryCode: IND, District: Karnataka, Population: 2660088
    ID: 1031, Name: Kanpur, CountryCode: IND, District: Uttar Pradesh, Population: 1874409
    ....
    ....
    Enter City Country Code :PAK
    ID: 2822, Name: Karachi, CountryCode: PAK, District: Sindh, Population: 9269265
    ID: 2823, Name: Lahore, CountryCode: PAK, District: Punjab, Population: 5063499
    ID: 2824, Name: Faisalabad, CountryCode: PAK, District: Punjab, Population: 1977246
    ID: 2825, Name: Rawalpindi, CountryCode: PAK, District: Punjab, Population: 1406214
    ID: 2826, Name: Multan, CountryCode: PAK, District: Punjab, Population: 1182441
    ID: 2827, Name: Hyderabad, CountryCode: PAK, District: Sindh, Population: 1151274
    ID: 2828, Name: Gujranwala, CountryCode: PAK, District: Punjab, Population: 1124749
    ....
    ....
    
    
    To Download JDBCCallableStatementDemoinputparam-mysql-App  Project Click the below link

    https://sites.google.com/site/javaee4321/jdbc/JDBCCallableStatementDemoinputparam-mysql-App.zip?attredirects=0&d=1

    See also:
  • All JavaEE Viedos Playlist
  • All JavaEE Viedos
  • All JAVA EE Links
  • Servlets Tutorial
  • All Design Patterns Links
  • JDBC Tutorial
  • Java Collection Framework Tutorial
  • Tutorials