Showing posts with label Programming for Beginners. Show all posts

Sunday, 24 March 2024

Mastering Gradle for Beginners: A Sandwich Analogy Tutorial

🚀 Love learning Java simply? 🚀
Click here to Subscribe to Ram N Java and never miss a tutorial!

What is Gradle? Let’s Make a Sandwich!

Imagine you are making a delicious sandwich. You need various ingredients like bread, veggies, and cheese. To make the perfect sandwich efficiently, a cooking assistant would be very helpful. In the world of software, Gradle is that assistant!

How Gradle Works (The Simple Way)

1. Gathering Your Ingredients

Just like you gather bread and cheese, developers need "code libraries" and files. Gradle automatically fetches these from different places so you don't have to find them manually.

2. Mixing Everything Together

Once you have the ingredients, you have to layer them correctly. Gradle takes all those code pieces and arranges them in the perfect order to build your software.

3. Customizable Recipes

Whether you want a club sandwich or a grilled cheese, the process changes slightly. Similarly, Gradle can adjust to build websites, mobile apps, or any software project you are working on.

4. Fast and Precise

A great assistant knows exactly where every ingredient belongs, making the cooking fast. Gradle knows your project structure so well that it builds your software quickly and accurately.

5. Great for Teamwork

When multiple people are making sandwiches together, things can get messy. Gradle helps many developers work on the same project smoothly, making teamwork much easier.


More Java Tutorials for You

Sunday, 17 March 2024

Understanding API Gateway: The Waiter Analogy

🚀 Enjoying the "Ram N Java" way of learning?

Don't miss out on more easy-to-understand tech guides!

SUBSCRIBE TO RAM N JAVA

Understanding API Gateway: The Simple Waiter Analogy

Have you ever wondered how complex computer systems manage to talk to each other without creating total chaos? In this post, we’re breaking down the concept of an API Gateway using a simple analogy that anyone can understand.

The Restaurant Analogy

Imagine you are sitting at a table in a busy restaurant. You want to order a meal. Instead of walking into the noisy kitchen to talk to five different chefs, you stay at your table. A waiter comes to you, takes your order, and communicates it to the right people in the kitchen.

When the food is ready, the waiter brings it back to you. You didn't need to know which chef cooked what or how the kitchen was organized—you only interacted with the waiter.

What is an API Gateway?

In software architecture, the API Gateway is that professional waiter. It sits right between you (the user) and a big collection of complex backend services.

  • Unified Entry Point: You only have to talk to one "person" (the Gateway) to get everything you need.
  • Request Routing: It knows exactly which service needs to handle your specific request.
  • Simplified Experience: It handles the technical details so you can focus on the results.

Why is it Essential?

Without an API Gateway, your app would have to manage dozens of different connections at once. The Gateway streamlines everything, making the system faster, safer, and much easier to manage.

More Helpful Tutorials from Ram N Java

Check out these other videos to keep your learning journey going:

Saturday, 24 February 2024

Understanding Maven: Beginner's Guide to Building Java Projects

Demystifying Apache Maven: A Beginner's Journey

🔔 Want to level up your Java skills?

Join Ram N Java for simplified technical tutorials!

SUBSCRIBE NOW

What Exactly is Maven?

Imagine you are building a house. You need bricks, cement, tools, and a blueprint. In the world of Java programming, **Maven** is the tool that gathers all your materials (libraries) and follows your blueprint (project configuration) to build your software automatically.

Why Do Beginners Love Maven?

Before Maven, developers had to manually download JAR files and add them to their projects. This was a nightmare! Maven solved this by introducing:

  • Standard Project Structure: Every Maven project looks the same, making it easy to understand.
  • Automatic Dependency Management: Just tell Maven what library you need in the pom.xml file, and it downloads it for you.
  • Build Lifecycle: One simple command can compile, test, and package your entire application.

The Magic of POM.xml

The heart of any Maven project is the Project Object Model (POM) file. It's an XML file that contains all the information about the project, including its name, version, and the external plugins or libraries it depends on. Think of it as the "Brain" of your project.

Explore More Java & Maven Tutorials

If you enjoyed this, you might find these helpful:

Friday, 23 February 2024

Spring Boot for Beginners: Simplified with Magical House Tool Kit Examples

🚀 Level Up Your Coding Skills!

Master Java and Spring Boot with the easiest analogies on the web. Don't miss a single lesson!

SUBSCRIBE TO RAM N JAVA

Spring Boot: The Magical House Tool Kit

Starting with Spring Boot often feels like trying to build a house from scratch. But what if you had a Magical Tool Kit that did most of the work for you? In this guide, we use the "Magical House" analogy to make complex Spring Boot concepts crystal clear for beginners.

The Traditional Way vs. The Spring Boot Way

In traditional Java development, you are responsible for everything: buying the wood, mixing the cement, and even making your own nails. This is time-consuming and prone to errors.

Spring Boot is your Magical Tool Kit. When you say "I want to build a kitchen," the kit automatically provides the stove, the sink, and the plumbing. You don't need to configure every single detail manually because the kit uses Smart Defaults.

Key Takeaways from the Analogy

  • Auto-Configuration: Like a kit that knows exactly where the light switches should go.
  • Starters: Think of these as "Room Bundles." Need a bathroom? Just grab the Bathroom Starter.
  • Efficiency: Spend less time on the foundation and more time decorating your "Magical House" (your unique app features).

Pro Tip: Don't get overwhelmed by the code. Focus on the logic of how these tools work together to save you time!

Sunday, 14 January 2024

Understanding CRUD Operations Using User Data: Easy Steps

🚀 Master Java & Spring Boot with Me!

SUBSCRIBE TO RAM N JAVA

Mastering CRUD Operations in Java: A Beginner's Roadmap

If you are starting your journey in software development, CRUD is the most important concept you need to learn. Whether you are building a simple mobile app or a complex website, managing data is the heart of everything.

What exactly is CRUD?

CRUD stands for four basic operations that you perform on any database:

  • Create: Adding new data (like registering a new user).
  • Read: Retrieving or viewing data (like looking at your profile).
  • Update: Changing existing data (like updating your password).
  • Delete: Removing data (like closing an account).

Why Java for CRUD?

Java is a "strongly typed" language, which means it is very stable and less prone to errors when handling large amounts of data. Using frameworks like Spring Boot, Java makes it incredibly easy to connect to databases and perform these operations with very little code.

The Basic Workflow

To build a CRUD application in Java, you generally follow these three simple steps:

  1. Model: Define what your data looks like (e.g., Name, Email, Age).
  2. Repository: Use a special Java interface that talks to the database.
  3. Controller: Create the "endpoints" that allow a user to interact with the data from a browser or app.

Summary

Once you master these four operations, you can build almost any kind of application! In the video above, we dive deep into how to implement this from scratch so you can start coding your own projects today.


Explore More Tutorials from Ram N Java:

Wednesday, 18 October 2023

REST API Best Practices Made Easy: A Bakery Analogy

Want to Master Java & APIs?

Join the Ram N Java family for simplified tech tutorials!

SUBSCRIBE TO RAM N JAVA

REST API Best Practices: The Bakery Analogy

Building a REST API is a lot like running a bakery. If you want your customers to keep coming back, you need to be organized, predictable, and clear about what you offer. Let's break down the best practices using this simple analogy.

What is a REST API?

Think of the API as the counter at your favorite bakery. You (the client) go to the counter to ask for a cupcake (the data). The person behind the counter (the server) takes your request and gives you exactly what you asked for.

1. Use Clear Labels (Nouns, not Verbs)

In a bakery, you have labels like /cakes or /cookies. You don't see labels like "GetMeACake." In REST, your endpoints should be nouns.

Good: /products
Bad: /getAllProducts

2. Predictable Actions (HTTP Methods)

Imagine if you had to use a different language every time you wanted to buy or return a cake. That would be confusing! REST uses standard "methods" to tell the server what you want to do:

  • GET: Just looking at the menu or taking a cake home.
  • POST: Placing a new special order.
  • PUT: Changing the frosting on an order you already placed.
  • DELETE: Canceling your order.

3. Clean Packaging (JSON)

When you buy a cake, it comes in a box that is easy to carry and open. In the world of APIs, that "box" is usually JSON. It’s lightweight, easy to read for both humans and computers, and keeps the data organized.

Conclusion

By following these simple rules, you make it easy for other developers to use your API. Just keep it simple, keep it consistent, and treat your API like a well-run bakery!

Sunday, 23 July 2023

Explain APIs: A Beginner's Guide - Using the analogy of Restaurant and Waiter

🚀 Level Up Your Java Skills!

Join the Ram N Java family for more simple, real-world tech explanations.

SUBSCRIBE NOW

Understanding APIs: The Simplest Analogy

Have you ever wondered how your phone apps get data from the internet? It can seem like magic, but it's actually done through something called an API. To make it super easy, let's use a Restaurant Analogy!

The Three Key Players

1. You (The Customer)

You represent the Client (your mobile app or browser). You know what you want to eat, but you can't go into the kitchen yourself.

2. The Kitchen (The Server)

The kitchen is the System or Database. It has all the data and tools to prepare your request, but it needs to know exactly what you want.

3. The Waiter (The API)

This is the API! The waiter takes your order, carries it to the kitchen, and then brings the food (the data) back to your table. Without the waiter, the kitchen and the customer couldn't communicate.

Why is this important?

APIs allow different software systems to talk to each other securely and efficiently. Just like a waiter ensures you get the right dish without you needing to know how to cook, an API ensures your app gets the right data without needing to know how the server works.

Conclusion

Whether you're booking a flight, checking the weather, or scrolling through social media, APIs are working behind the scenes to make it all happen!

Tuesday, 3 January 2023

What Is REST API? Examples And How To Use It | REST API concepts and examples | RESTful Web Services

🚀 Elevate Your Career!

Subscribe to Ram N Java for the most simplified and professional tech tutorials!

SUBSCRIBE TO OUR CHANNEL

REST API: Essential Concepts for Beginners

If you're aiming to become a modern software developer, understanding REST APIs is not optional—it's essential. This guide breaks down the core concepts and provides real-world examples to help you grasp how systems communicate over the web.

Core REST Constraints

To be considered "RESTful," an API should follow certain architectural rules:

  • Client-Server Architecture: Separation of concerns between the user interface and the data storage.
  • Statelessness: Each request from a client must contain all the information needed to understand and process the request.
  • Uniform Interface: Simplifies and decouples the architecture, allowing each part to evolve independently.

How Communication Happens

REST APIs typically use JSON (JavaScript Object Notation) to exchange data because it's lightweight and easy for both humans and machines to read. When you send a request, the server responds with a Status Code (like 200 for success or 404 for not found) to tell you how it went.

Practical Examples

Think of any app you use. When you scroll through a travel app to find hotels, the app is making a GET request to a REST API. When you book that hotel, it's sending a POST request with your details. It's the invisible bridge connecting your device to the world's data.

📥 Download the Presentation!

I always share my PowerPoint slides and source code! You can find the direct download links in the description of the YouTube video above. Happy learning!

Monday, 31 October 2022

How to Install Java 19 on Windows 10/11, JDK installation | How to Install Java JDK 19 on Windows 11

🚀 Loved this tutorial?

Subscribe to Ram N Java for more easy-to-follow coding guides!

SUBSCRIBE NOW

Easy Guide: Installing Java JDK 19 on Windows 11

Setting up Java is the first step toward becoming a developer. In this guide, we will walk through the simple steps to install JDK 19 and run your very first program.

Step 1: Download JDK 19

Go to the official Oracle website and search for Java downloads. Select the Windows tab and download the x64 Installer (the .exe file). This is the easiest version to install on most modern PCs.

Step 2: Run the Installation

Once the download is complete, open the file. Follow the installation wizard. You can choose a custom folder or leave it as the default. Wait for the success message to appear.

Step 3: Set Environment Variables

To make sure Java works everywhere on your computer, you need to add it to your system path:

  • Copy the path to your JDK bin folder.
  • Search for "Environment Variables" in Windows.
  • Edit the "Path" variable and paste your bin folder location.

Step 4: Verify Your Installation

Open your Command Prompt and type java -version. If everything is correct, you will see "java version 19" on your screen!

Step 5: Configure in Eclipse

If you use Eclipse, go to Preferences > Java > Installed JREs. Click "Add," select your JDK 19 folder, and set it as the default. Now you are ready to write and run code!

More Java Tutorials for You:

Saturday, 6 August 2022

How to install JDK8 in Windows 11? | JDK8 Installation (Windows Operating System)

🚀 Master Java Development!

Want to become a pro developer? Subscribe to Ram N Java for the best step-by-step coding tutorials.

SUBSCRIBE TO RAM N JAVA

Step-by-Step Guide: Installing JDK 8 on Windows 11

Setting up your development environment is the first step toward building great software. In this guide, we walk through the exact process of installing Java Development Kit (JDK) 8 on the latest Windows 11 operating system.

1. Downloading the JDK

The first thing you need to do is head over to the official Oracle website. You’ll need to find the Java SE Development Kit 8 section and choose the Windows x64 installer. Remember, you might need to sign in or create a free Oracle account to start the download.

2. Running the Installer

Once the file is downloaded, double-click to run it. The installation process is straightforward—mostly clicking "Next." However, pay close attention to the installation path (usually C:\Program Files\Java\jdk1.8.x), as you will need this for the next step.

3. Setting Environment Variables

This is a crucial step! To make Java work globally on your computer, you must configure your System Environment Variables.

  • Create a new variable named JAVA_HOME and point it to your JDK installation folder.
  • Update the Path variable by adding %JAVA_HOME%\bin to the list.

4. Verifying the Installation

To make sure everything is working perfectly, open your Command Prompt (CMD) and type: java -version. If you see "java version 1.8" on your screen, congratulations! You are ready to start coding.

Check Out These Helpful Tutorials

Beyond coding, staying secure online is vital. Explore these essential Google Pay guides from our channel:

Friday, 23 October 2020

MongoDB - Query Document using Greater than and Greater than Equals Operations | MongoDB Tutorial

🚀 Level Up Your Career!

Don't miss out on expert tutorials! Subscribe to Ram N Java for simplified tech learning.

JOIN THE COMMUNITY

Mastering MongoDB: Using Greater Than ($gt) and Greater Than Equals ($gte)

Filtering data is one of the most common tasks in database management. Today, we’re focusing on how to find data that meets specific numerical or date thresholds using the Greater Than ($gt) and Greater Than Equals ($gte) operators in MongoDB.

Understanding the Operators

In simple terms, these operators help you query ranges. Whether you want to find products priced above $50 or students with grades 75 and above, these are the tools you'll use.

  • $gt (Greater Than): Returns documents where the value is strictly higher than what you specify.
  • $gte (Greater Than or Equal To): Returns documents where the value is higher than or exactly equal to your specified value.

Step-by-Step Syntax

The syntax is very beginner-friendly. Here is how you write a query to find documents with a "price" greater than 500:

db.products.find({
  price: { $gt: 500 }
})

If you want to include items that are exactly 500 as well, simply swap $gt for $gte. It’s that easy!

Why These Operators Matter

Using range operators allows you to create dynamic features like price filters on e-commerce sites, date-range searches for blogs, or performance tracking in business apps. Mastering these is a huge step toward becoming a proficient developer.


More from the Ram N Java Channel:

Wednesday, 18 December 2019

Spring Boot - Thymeleaf Example | Spring Boot Tutorial

🚀 Level Up Your Java Skills!

Master the art of Web Development with Ram N Java. Get the latest tutorials delivered straight to you!

SUBSCRIBE NOW 🔔

Mastering Spring Boot + Thymeleaf

Building a modern web application doesn't have to be complicated. By combining the power of Spring Boot with the simplicity of Thymeleaf, you can create dynamic, professional websites in no time.

What is Spring Boot?

Spring Boot is a Java-based framework that makes it incredibly easy to create "just run" applications. It handles all the difficult setup for you, so you can focus on writing your actual code.

Why Use Thymeleaf?

Thymeleaf is a modern Server-Side Template Engine. It allows you to create HTML files that can actually display real data from your Java code. It's famous for being:

  • Easy to Read: It looks like standard HTML.
  • Dynamic: It updates content instantly based on user input.
  • Fast: It integrates perfectly with the Spring ecosystem.

How They Work Together

In a typical app, Spring Boot acts as the "Brain," handling logic and data, while Thymeleaf acts as the "Face," showing the user what they need to see.

"With these two tools, you can build everything from a simple blog to a complex e-commerce platform!"

Check Out More From My Channel

Here are 3 more hand-picked tutorials for you:

Sunday, 1 September 2019

Spring Boot starters example | Spring Boot tutorial

🚀 Level Up Your Java Journey!

Want to master Spring Boot and build modern apps faster? Join the Ram N Java community today!

SUBSCRIBE NOW 🔔

What are Spring Boot Starters?

Before Spring Boot, setting up a Java project was like assembling a thousand-piece puzzle. You had to manually find and add dozens of different libraries, making sure they all worked together. Spring Boot Starters changed everything!

The "One-Stop-Shop" for Dependencies

A "Starter" is essentially a curated set of convenient dependency descriptors that you can include in your application. Instead of adding ten separate libraries for a web app, you just add one starter.

Why Beginners Love Starters

Think of it like ordering a "Combo Meal" at a restaurant. Instead of buying the burger, fries, and drink separately, you order the combo. Spring Boot Starters provide:

  • Consistency: All libraries are tested to work together perfectly.
  • Clean Code: Your pom.xml or build.gradle stays short and readable.
  • Speed: Go from a blank screen to a running app in seconds!

Popular Starters You Should Know

Spring Boot provides many starters for different needs. Here are the most common ones:

  • spring-boot-starter-web: For building web apps and RESTful services.
  • spring-boot-starter-data-jpa: For connecting to databases easily.
  • spring-boot-starter-test: Everything you need for testing your code.

Continue Learning

Check out these related tutorials from the channel:

Tuesday, 11 June 2019

How to Bootstrap a spring boot Application using STS (Spring Tool Suite)? | Spring Boot tutorial

🚀 Ready to Master Spring Boot?

Join the Ram N Java community for the best Java tutorials and simplified coding tips!

SUBSCRIBE TO RAM N JAVA

How to Bootstrap Spring Boot with Spring Tool Suite (STS)

Starting a new project can be the hardest part of development. But with Spring Tool Suite (STS), bootstrapping a Spring Boot application is incredibly fast and efficient. Let's dive into how you can get your project up and running in minutes!

What is Bootstrapping?

In the world of coding, "bootstrapping" simply means starting a process that continues without external help. For Spring Boot, it's the process of setting up the basic project structure, dependencies, and configuration so you can start writing your business logic immediately.

Why Use STS?

STS is a version of Eclipse that is specifically customized for Spring applications. It comes pre-loaded with:

  • Spring Starter Project Wizard: A built-in version of start.spring.io.
  • Boot Dashboard: To manage and run your apps easily.
  • Smart Code Completion: Specifically designed for Spring annotations.

Simple Steps to Start

1. Open STS and go to File > New > Spring Starter Project.
2. Name your project and choose your Java version.
3. Select your dependencies (like Spring Web or DevTools).
4. Click Finish and watch STS build your perfect project!

Pro Tip

Always include Spring Boot DevTools in your initial setup. It will automatically restart your server whenever you save changes to your code, saving you hours of manual restarts!


Explore More on My Channel:

Friday, 6 April 2018

How to create spring hello world project using maven | Spring Tutorial | Spring basics

🚀 Master Spring & Java with Ram N Java!

Want to become a Pro Developer? Join our community today for crystal-clear coding tutorials!

SUBSCRIBE NOW (IT'S FREE!)

Building Your First Spring Maven Project

Starting your journey with the Spring Framework? The best way to begin is by creating a simple "Hello World" application. In this guide, we use Maven to handle all our dependencies, making the setup professional and efficient!

1. Why Use Maven for Spring?

Maven is a powerful build tool. Instead of manually downloading JAR files, you simply list what you need in a pom.xml file. Maven then automatically downloads and manages everything for you. It's the industry standard for Java development!

2. Setting Up the POM.xml

The core of your project is the pom.xml. To get Spring running, you need to add the spring-context dependency. This gives you access to the Spring IoC container, which will manage your "Hello World" bean.

3. Creating Your First Bean

In Spring, a "Bean" is just a simple Java object managed by the framework. We create a class with a simple method like sayHello(). We then tell Spring about this bean using an XML configuration file or Java annotations.

4. Running the Application

To see the magic happen, we use ApplicationContext to load our configuration. When we ask the context for our bean and call the method, Spring delivers the object perfectly initialized. Congratulations, you've just run your first Spring app!


Click here to watch on Youtube:
https://www.youtube.com/watch?v=AnIXL0YXszA&list=UUhwKlOVR041tngjerWxVccw

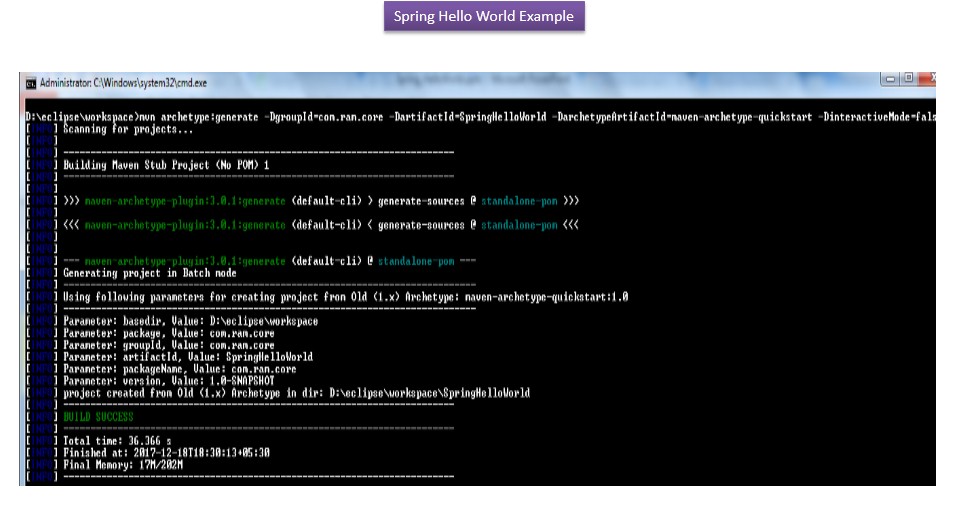
Click the below Image to Enlarge:
How to create spring hello world project using maven | Spring Tutorial | Spring basics

How to create spring hello world project using maven | Spring Tutorial | Spring basics

How to create spring hello world project using maven | Spring Tutorial | Spring basics

How to create spring hello world project using maven | Spring Tutorial | Spring basics

How to create spring hello world project using maven | Spring Tutorial | Spring basics

How to create spring hello world project using maven | Spring Tutorial | Spring basics

How to create spring hello world project using maven | Spring Tutorial | Spring basics

How to create spring hello world project using maven | Spring Tutorial | Spring basics

How to create spring hello world project using maven | Spring Tutorial | Spring basics

How to create spring hello world project using maven | Spring Tutorial | Spring basics

How to create spring hello world project using maven | Spring Tutorial | Spring basics

How to create spring hello world project using maven | Spring Tutorial | Spring basics

How to create spring hello world project using maven | Spring Tutorial | Spring basics

How to create spring hello world project using maven | Spring Tutorial | Spring basics

Maven Commands and Spring 5 dependencies.txt


Generate project structure with Maven:

mvn archetype:generate -DgroupId=com.ram.core -DartifactId=SpringHelloWorld -DarchetypeArtifactId=maven-archetype-quickstart -DinteractiveMode=false


Convert to Eclipse project:

mvn eclipse:eclipse

Compile:

mvn clean compile


Spring 5 dependencies:

<properties>
    <spring.version>5.0.2.RELEASE</spring.version>
</properties>


<!-- Spring 5 dependencies -->
<dependency>
    <groupId>org.springframework</groupId>
    <artifactId>spring-core</artifactId>
    <version>${spring.version}</version>
</dependency>

<dependency>
    <groupId>org.springframework</groupId>
    <artifactId>spring-context</artifactId>
    <version>${spring.version}</version>
</dependency>

pom.xml

<project xmlns="http://maven.apache.org/POM/4.0.0" xmlns:xsi="http://www.w3.org/2001/XMLSchema-instance"
    xsi:schemaLocation="http://maven.apache.org/POM/4.0.0%20http://maven.apache.org/maven-v4_0_0.xsd">
    <modelVersion>4.0.0</modelVersion>
    <groupId>com.ram.core</groupId>
    <artifactId>SpringHelloWorld</artifactId>
    <packaging>jar</packaging>
    <version>1.0-SNAPSHOT</version>
    <name>SpringHelloWorld</name>
    <url>http://maven.apache.org</url>

    <properties>
        <spring.version>5.0.2.RELEASE</spring.version>
    </properties>

    <dependencies>
        <dependency>
            <groupId>junit</groupId>
            <artifactId>junit</artifactId>
            <version>3.8.1</version>
            <scope>test</scope>
        </dependency>

        <!-- Spring 5 dependencies -->
        <dependency>
            <groupId>org.springframework</groupId>
            <artifactId>spring-core</artifactId>
            <version>${spring.version}</version>
        </dependency>

        <dependency>
            <groupId>org.springframework</groupId>
            <artifactId>spring-context</artifactId>
            <version>${spring.version}</version>
        </dependency>

    </dependencies>
</project>

HelloWorld.java

package com.ram.core;

/**
 * Spring bean
 *
 */

public class HelloWorld
{
    private String name;

    public void setName(String name)
    {
        System.out.println("setName(String name) method is called, "+name);
        this.name = name;
    }

    public void printHello()
    {
        System.out.println("Spring 5 : Hello World! " + name);
    }
}

SpringBeans.xml

<beans xmlns="http://www.springframework.org/schema/beans"
    xmlns:xsi="http://www.w3.org/2001/XMLSchema-instance"
    xsi:schemaLocation="http://www.springframework.org/schema/beans
http://www.springframework.org/schema/beans/spring-beans-4.3.xsd">


    <bean id="helloBean" class="com.ram.core.HelloWorld">
        <property name="name" value="Peter" />
    </bean>

</beans>

App.java

package com.ram.core;

import org.springframework.context.ApplicationContext;
import org.springframework.context.support.ClassPathXmlApplicationContext;

public class App
{
    public static void main(String[] args)
    {
        ApplicationContext context = new ClassPathXmlApplicationContext(
                "SpringBeans.xml");

        HelloWorld helloWorldObj = (HelloWorld) context.getBean("helloBean");
        System.out.println(
                "Got helloWorldObj from the ApplicationContext(Spring Container)");
        helloWorldObj.printHello();

    }
}

Output

Mar 25, 2018 8:26:56 AM org.springframework.context.support.AbstractApplicationContext prepareRefresh
INFO: Refreshing org.springframework.context.support.ClassPathXmlApplicationContext@5b37e0d2: startup date [Sun Mar 25 08:26:56 IST 2018]; root of context hierarchy
Mar 25, 2018 8:26:56 AM org.springframework.beans.factory.xml.XmlBeanDefinitionReader loadBeanDefinitions
INFO: Loading XML bean definitions from class path resource [SpringBeans.xml]
setName(String name) method is called, Peter
Got helloWorldObj from the ApplicationContext(Spring Container)
Spring 5 : Hello World! Peter

Click the below link to download the code:
https://sites.google.com/site/ramj2eev2/java_basics/SpringHelloWorld_import_eclipse.zip?attredirects=0&d=1

Github Link:
https://bitbucket.org/ramram43210/spring/src/a60a91aa34013374c842d2668a441068c9cc47ff/Spring_2018/SpringHelloWorld_import_eclipse/?at=master

Bitbucket Link:
https://github.com/ramram43210/javaee/tree/master/Spring_2018/SpringHelloWorld_import_eclipse

See also:

  • All JavaEE Videos Playlist
  • All JavaEE Videos
  • All JAVA EE Links
  • Servlets Tutorial
  • All Design Patterns Links
  • JDBC Tutorial
  • Java Collection Framework Tutorial
  • JAVA Tutorial
  • Kids Tutorial
  • Cooking Tutorial
  • Tutorials