Wednesday, 29 July 2015

Java Tutorial : The Main method

Want to master Java the easy way?

Subscribe to Ram N Java for simple, beginner-friendly core Java tutorials, code walkthroughs, and practical guides.

Subscribe Now

Understanding the Main Method in Java

In Java, every standalone application needs an entry point where execution begins. That entry point is the main method. Without it, the Java Virtual Machine (JVM) does not know where to start running your program.

Breaking Down the Method Signature

The standard signature looks like this:

public static void main(String[] args)

Let's understand what each keyword represents:

  • public: An access modifier that lets the JVM invoke this method from outside the class.
  • static: Allows the JVM to call the method directly without needing to create an object of the class first.
  • void: Indicates that the method doesn't return any value after execution finishes.
  • main: The exact name that the JVM looks for to begin program execution.
  • String[] args: An array of strings used to pass command-line arguments to your application at runtime.

Complete Example: Reading Command-Line Arguments

Here is an example demonstrating how your program receives and iterates through command-line inputs:

public class MyApp {
    public static void main(String[] args) {
        System.out.println("Argument count: " + args.length);

        if (args.length == 0) {
            System.out.println("No arguments passed");
        } else {
            for (String arg : args) {
                System.out.println("Argument: " + arg);
            }
        }
    }
}

Running with Arguments via Command Prompt

To compile and run this code with values passed to String[] args, follow these terminal commands:

javac MyApp.java
java MyApp Peter John Julie Ram

The console will output the count along with each argument printed on a new line:

Argument count: 4
Argument: Peter
Argument: John
Argument: Julie
Argument: Ram

Recommended Java Tutorials From Our Channel

Level up your Java skills with these related beginner tutorials:


Click here to watch in Youtube :
https://www.youtube.com/watch?v=IRnfSsyKHyA&list=UUhwKlOVR041tngjerWxVccw

MyApp.java

/**
 * This program prints arguments passed in the output screen.
 */
public class MyApp
{

    public static void main(String[] args)
    {

        System.out.println("Argument Length : "+args.length);
        
        if (args.length == 0)
        {
            System.out.println("No arguments passed");  
        }
        else
        {
            for (String arg : args)
            {
                System.out.println(arg);
            }
        }

    }
}

Output
Argument Length : 3
peter
john
juli

Click the below Image to Enlarge
Java Tutorial : The Main method

Java Tutorial : The Main method

Java Tutorial : The Main method

Java Tutorial : The Main method

Java Tutorial : The Main method

Java Tutorial : The Main method

Java Tutorial : The Main method

Java Tutorial : The Main method
To Download DisplayAllHeadersApp Project Click the below link
https://sites.google.com/site/javaee4321/java/JavaArgsDemoApp.zip?attredirects=0&d=1

See also:
  • All JavaEE Viedos Playlist
  • All JavaEE Viedos
  • All JAVA EE Links
  • Servlets Tutorial
  • All Design Patterns Links
  • JDBC Tutorial
  • Java Collection Framework Tutorial
  • JAVA Tutorial
  • Java Tutorial : Java Basic Program

    Enjoying the tutorial? Join our developer family!

    Subscribe to Ram N Java for beginner-friendly Java lessons, tips, and step-by-step programming guides.

    Subscribe Now

    Introduction to Java Programming

    Starting with a new programming language can feel overwhelming, but Java makes the core process straightforward. In this beginner guide, we will write, compile, and run your very first Java program from scratch using the command prompt.

    How Java Works Behind the Scenes

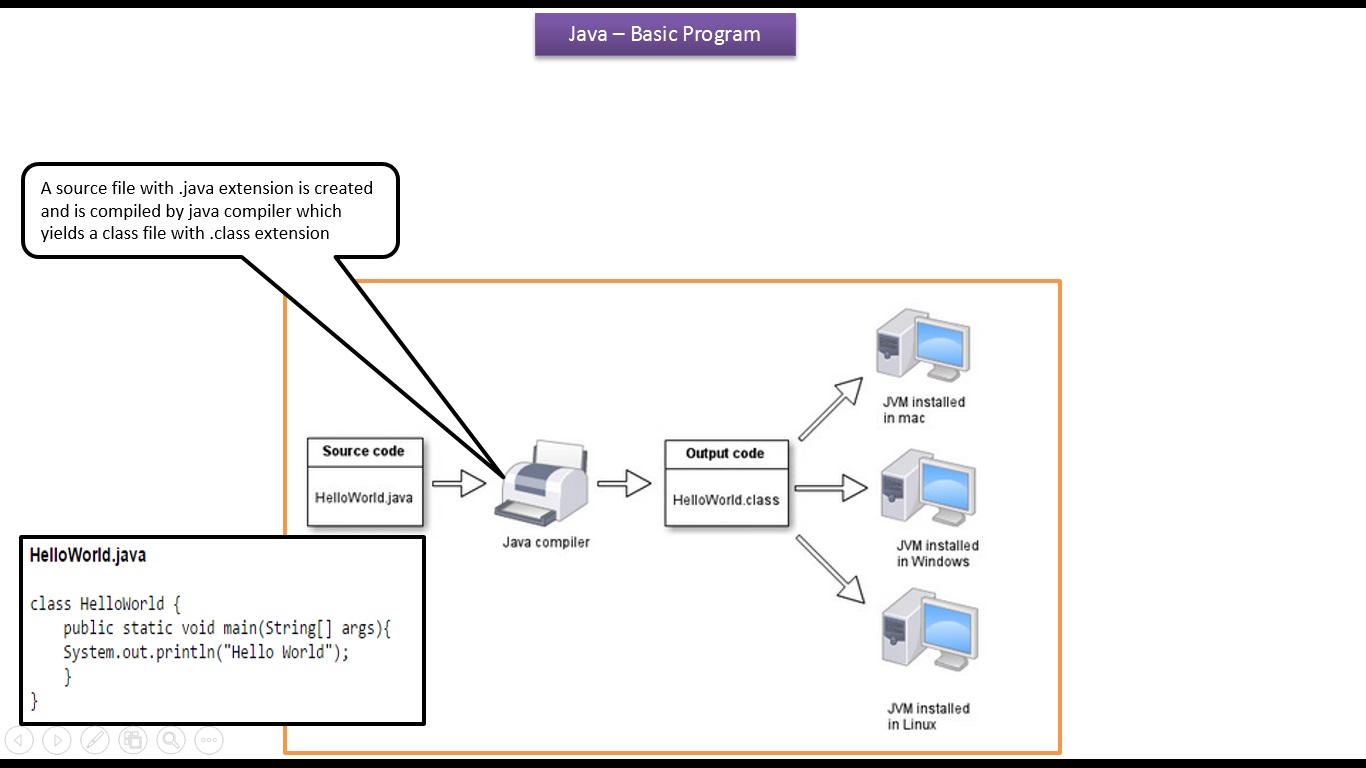
    To run code in Java, there is an important 3-step cycle you should know:

    1. Create the Source Code: You write your program in plain text and save it with a .java extension (for example, HelloWorld.java).
    2. Compile with Java Compiler: The compiler (javac) checks your code and turns it into a .class file containing platform-independent bytecode.
    3. Run with JVM: The Java Virtual Machine (JVM) executes the bytecode and displays your output on screen.

    Why Java is Platform Independent

    Because the compiler converts your source code into bytecode rather than machine-specific instructions, the compiled .class file can run on Windows, macOS, Linux, or Solaris without modification—as long as the machine has the Java Virtual Machine (JVM) installed.

    Writing the First Program: HelloWorld.java

    Open any text editor and type the following code:

    public class HelloWorld {
        public static void main(String[] args) {
            System.out.println("Hello World");
        }
    }

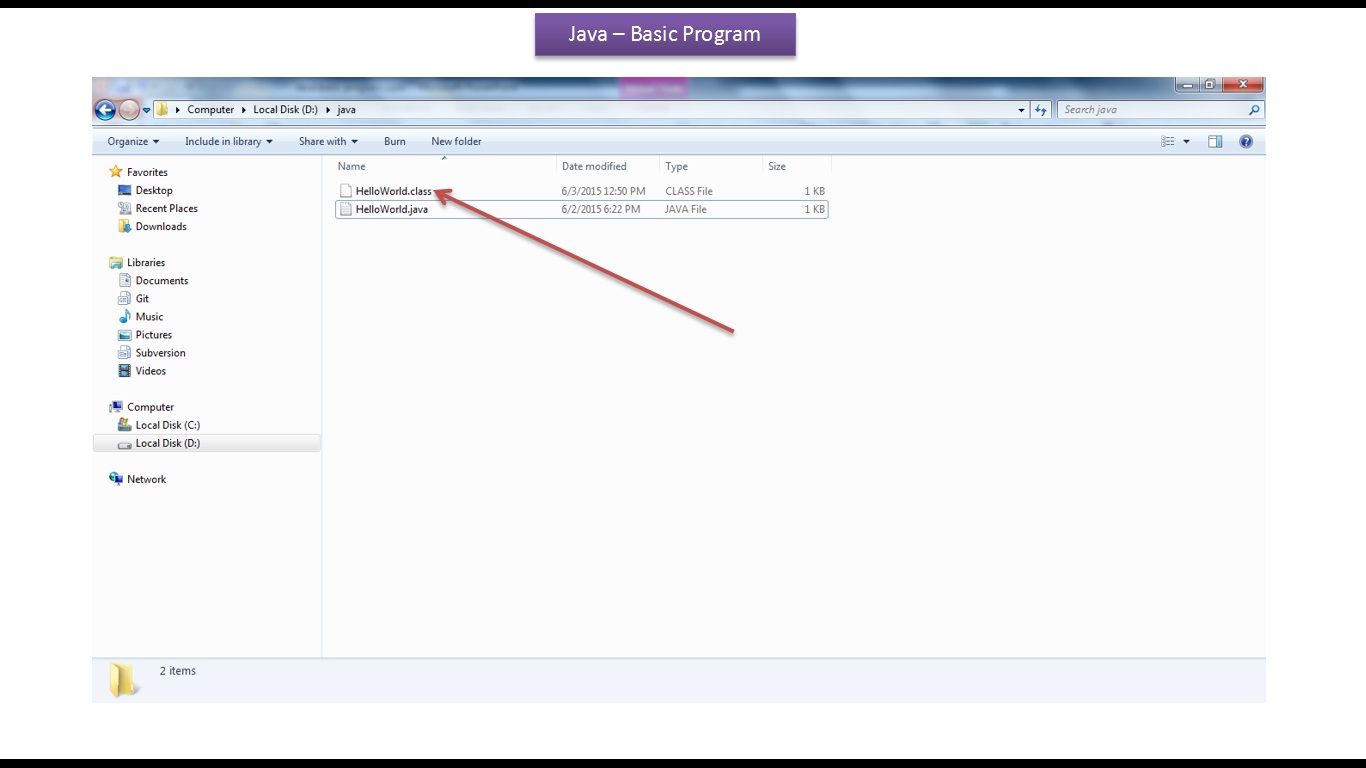
    Save this file with the exact name HelloWorld.java.

    Compiling and Running via Command Prompt

    Follow these quick steps to execute your program:

    • Open your terminal or command prompt and navigate to the folder where you saved HelloWorld.java.
    • Compile the program:
      javac HelloWorld.java
      This creates the HelloWorld.class file in your folder.
    • Run the compiled bytecode:
      java HelloWorld

    You will see the output displayed directly in your command window:

    Hello World

    Recommended Java Tutorials From Our Channel

    Continue your Java learning journey with these hand-picked beginner guides:


    Click here to watch in Youtube :
    https://www.youtube.com/watch?v=9_z81tIs4Mk&list=UUhwKlOVR041tngjerWxVccw

    Click the below Image to Enlarge
    Java Tutorial : Java Basic Program

    Java Tutorial : Java Basic Program
    Java Tutorial : Java Basic Program
    Java Tutorial : Java Basic Program
    Java Tutorial : Java Basic Program
    Java Tutorial : Java Basic Program
    Java Tutorial : Java Basic Program
    Java Tutorial : Java Basic Program
    See also:
  • All JavaEE Viedos Playlist
  • All JavaEE Viedos
  • All JAVA EE Links
  • Servlets Tutorial
  • All Design Patterns Links
  • JDBC Tutorial
  • Java Collection Framework Tutorial
  • JAVA Tutorial
  • Java Tutorial : Java Comment

    Level Up Your Java Skills!

    Subscribe to Ram N Java for clean, step-by-step programming tutorials and tips.

    Subscribe to Channel

    What is a Comment in Java?

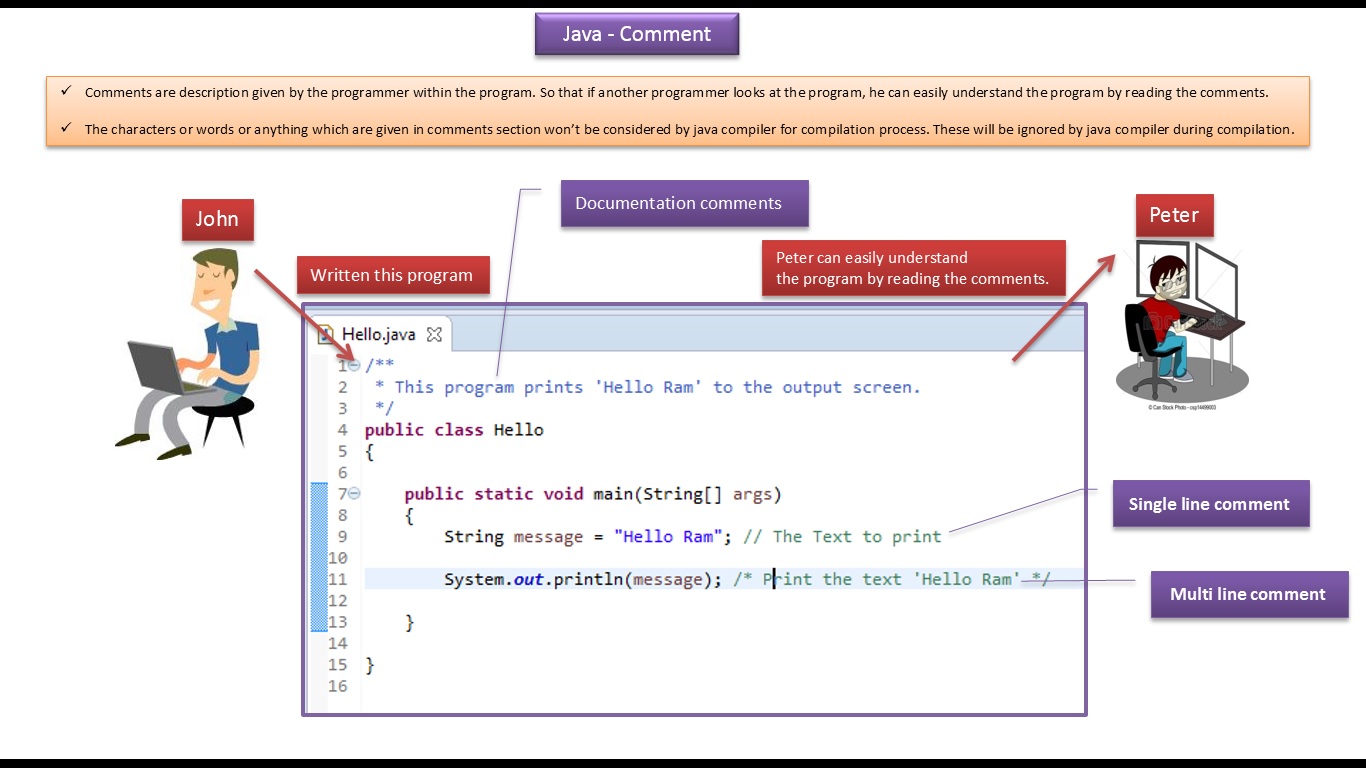
    A comment is an explanatory note or description added directly into the source code by a programmer.

    When you write code, comments serve as clear documentation. They help other developers understand what your program is doing without having to decipher every single line of logic. Crucially, any words or symbols placed inside comment sections are completely ignored by the Java compiler during compilation.

    The Three Types of Java Comments

    Java supports three distinct styles of comments to suit different documentation needs:

    1. Single-Line Comments

    Single-line comments start with two forward slashes (//). Everything from the slashes to the end of that specific line is treated as a comment.

    // This is a single-line comment
    System.out.println("Hello, Ram!");

    2. Multi-Line Comments

    When you need to write longer explanations spanning several lines, use multi-line comments. They begin with /* and terminate with */.

    /*
     * This is a multi-line comment.
     * It is great for longer descriptions
     * and documenting complex logic blocks.
     */

    3. Documentation Comments (Javadoc)

    Documentation comments start with /** and end with */. These are specialized comments used by the javadoc tool to automatically generate standard HTML documentation for your classes, methods, and packages.

    /**
     * This class demonstrates the use of comments in Java.
     * @author John
     */

    Why Are Comments Important?

    • Code Readability: Makes code easier to maintain and update over time.
    • Team Collaboration: Allows teammates to pick up where you left off smoothly.
    • Debugging: Allows you to temporarily disable code lines during testing without deleting them.

    More Core Java Tutorials

    Deepen your fundamentals with these related lessons from the channel:


    Click here to watch in Youtube :
    https://www.youtube.com/watch?v=ELPP5NOeaGw&list=UUhwKlOVR041tngjerWxVccw

    Click the below Image to Enlarge
    Java Tutorial : Java Comment
    See also:
  • All JavaEE Viedos Playlist
  • All JavaEE Viedos
  • All JAVA EE Links
  • Servlets Tutorial
  • All Design Patterns Links
  • JDBC Tutorial
  • Java Collection Framework Tutorial
  • JAVA Tutorial
  • Thursday, 23 July 2015

    Java Tutorial : What Can Java Technology do?

    Subscribe to Ram N Java!

    Never miss a lesson! Subscribe to our channel for clean, easy-to-follow Java tutorials.

    Subscribe Now

    Overview of Java Technology

    Java is both a high-level programming language and a powerful software platform. The Java platform brings together a complete ecosystem that enables developers to build, run, deploy, and manage versatile applications.

    1. Built-In Development Tools

    When you install the Java Development Kit (JDK), its bin folder includes critical executable utilities you will rely on every day:

    • javac: The Java compiler that transforms your source code into bytecode.
    • java: The launcher that executes your compiled Java applications.
    • javadoc: Generates HTML-based documentation directly from your code comments.
    • Debuggers & Monitoring Tools: Help trace errors and monitor application performance.

    2. The Application Programming Interface (API)

    Java comes equipped with a massive library of pre-written software components organized into packages. Packages group related classes and interfaces, such as:

    • java.lang: Houses fundamental classes like String, Integer, and System.
    • java.util: Provides essential data structures and collections, such as ArrayList, sets, and maps.

    The JDK is a superset of the Java Runtime Environment (JRE). While the JRE contains the runtime libraries and JVM needed to run programs, the JDK provides all of that plus the compilers and development tools.

    3. GUI Toolkits & Integration Libraries

    Beyond core utilities, Java technology provides frameworks to handle interactive interfaces and backend connections:

    • User Interface Toolkits: Build graphical user interfaces (GUIs) using modern frameworks like JavaFX, Swing, and AWT.
    • Integration Libraries: Connect with enterprise relational databases through JDBC or communicate across distributed networks using RMI.

    More Java Tutorials You'll Love

    Check out these related tutorials from the channel to continue building your skills:


    Click here to watch in Youtube :
    https://www.youtube.com/watch?v=Q16U8Ri53lM&list=UUhwKlOVR041tngjerWxVccw

    Click the below Image to Enlarge
    Java Tutorial : What Can Java Technology do? 
    Java Tutorial : What Can Java Technology do? 
    Java Tutorial : What Can Java Technology do? 
    Java Tutorial : What Can Java Technology do? 
    Java Tutorial : What Can Java Technology do? 
    Java Tutorial : What Can Java Technology do? 

    Java doc Link:

    https://docs.oracle.com/javase/8/docs/api/

    See also:

  • All JavaEE Viedos Playlist
  • All JavaEE Viedos
  • All JAVA EE Links
  • Servlets Tutorial
  • All Design Patterns Links
  • JDBC Tutorial
  • Java Collection Framework Tutorial
  • JAVA Tutorial
  • Java Tutorial : Java Platform

    Master Java with Ram N Java!

    Subscribe to get straightforward, beginner-friendly programming guides every week.

    Subscribe to Channel

    What is a Platform?

    In simple terms, a platform is the hardware or software environment in which an application runs.

    Most computer platforms combine hardware with an operating system. Familiar platforms include:

    • Microsoft Windows
    • Linux
    • macOS
    • Solaris

    How the Java Platform Works

    The Java Platform differs from hardware-based platforms because it is purely a software-based platform that sits on top of existing operating systems.

    It is made up of two essential components:

    • 1. Java Virtual Machine (JVM): The base engine that translates Java bytecode into instructions your underlying system understands.
    • 2. Java Application Programming Interface (API): A rich collection of ready-made software components and libraries, grouped into packages for easy development.

    Platform Independence in Action

    Because the JVM handles machine communication, your Java applications run across different operating systems without rewriting any code.

    Modern JVM optimizations and advanced compilers also ensure that your applications run smoothly and quickly while maintaining full portability.

    More Core Java Lessons

    Continue building your foundation with these fresh tutorials from our channel:


    Click here to watch in Youtube :
    https://www.youtube.com/watch?v=uicd3mMEBf0&list=UUhwKlOVR041tngjerWxVccw

    Click the below Image to Enlarge
    Java Tutorial : Java Platform
    Java Tutorial : Java Platform

    See also:
  • All JavaEE Viedos Playlist
  • All JavaEE Viedos
  • All JAVA EE Links
  • Servlets Tutorial
  • All Design Patterns Links
  • JDBC Tutorial
  • Java Collection Framework Tutorial
  • JAVA Tutorial
  • Tuesday, 21 July 2015

    Java Tutorial : Java Basics - Playlist

    Java Tutorial : The Java Programming Langauage

    Enjoying the Lesson? Support the Channel!

    Subscribe to Ram N Java for straightforward, beginner-friendly programming tutorials.

    Subscribe Now

    What is Java?

    Java is one of the world's most popular, reliable, and versatile programming languages. From enterprise web applications to mobile apps and large data systems, Java powers countless everyday digital platforms.

    When writing a program in Java, your source code is saved in plain text files that end with the .java extension (for example, HelloWorldApp.java).

    From Source Code to Bytecode

    Computers cannot understand human-readable Java code directly. Here is how Java bridges that gap:

    • The Java Compiler: The compiler takes your .java file and compiles it into a .class file (such as HelloWorldApp.class).
    • Bytecode: The .class file contains bytecode. Bytecode is the machine language of the Java Virtual Machine (JVM).
    • Execution: The JVM reads the bytecode instructions and runs your application on your system.

    Write Once, Run Anywhere (WORA)

    Java's greatest strength is platform independence. Because the Java compiler produces bytecode rather than machine-specific code, the compiled .class file can run seamlessly across different operating systems:

    • Microsoft Windows
    • Linux
    • macOS

    Every operating system has its own tailored version of the Java Virtual Machine. As long as a system has the JVM installed, it can run your compiled Java bytecode without needing any changes to your code.

    Recommended Next Lessons

    Continue your Java learning journey with these hand-picked tutorials from the channel:


    Click here to watch in Youtube :
    https://www.youtube.com/watch?v=CPUwrpGeJAY&list=UUhwKlOVR041tngjerWxVccw

    Click the below Image to Enlarge

    Java Tutorial : The Java Programming Langauage
    Java Tutorial : The Java Programming Langauage

    Java Tutorial : The Java Programming Langauage
    Java Tutorial : The Java Programming Langauage
    Java Tutorial : The Java Programming Langauage
    Java Tutorial : The Java Programming Langauage
    See also:
  • All JavaEE Viedos Playlist
  • All JavaEE Viedos
  • All JAVA EE Links
  • Servlets Tutorial
  • All Design Patterns Links
  • JDBC Tutorial
  • Java Collection Framework Tutorial
  • JAVA Tutorial
  • Monday, 20 July 2015

    Apache Maven : Apache Maven Installation (Linux OS)

    🚀 Want to Master Linux, Java & DevOps Build Tools?

    Subscribe to Ram N Java for beginner-friendly programming tutorials, server setups, and automated build guides!

    🔔 Subscribe to YouTube Channel

    Maven Installation on Linux: Your Ultimate Step-by-Step Guide

    Apache Maven is an essential open-source build automation and dependency management tool used across enterprise Java development and modern CI/CD pipelines. Installing Maven on a Linux distribution (such as Ubuntu, Debian, CentOS, Red Hat, or Amazon Linux EC2) enables you to compile code, package WAR and JAR artifacts, and manage project dependencies directly from the terminal.

    1. Prerequisites: Verify Java (JDK) on Linux

    Because Maven itself is written in Java and compiles Java code, having a properly configured Java Development Kit (JDK) is mandatory:

    • Check JDK Installation: Open your Linux terminal and execute:
      java -version
    • Verify JAVA_HOME: Ensure that your JAVA_HOME environment variable is set and accessible:
      echo $JAVA_HOME
    • If Java is not installed or the variable returns empty, install OpenJDK (version 8, 11, 17, or 21) before proceeding with the Maven setup.

    2. Downloading the Apache Maven Archive

    To obtain the latest stable release of Apache Maven:

    • Navigate to your temporary or installation directory (for instance, /tmp or /opt):
      cd /opt
    • Download the binary tarball archive (tar.gz) from Apache mirrors using wget:
      sudo wget https://dlcdn.apache.org/maven/maven-3/3.9.9/binaries/apache-maven-3.9.9-bin.tar.gz
    • Extract the downloaded archive using the tar command:
      sudo tar -xvzf apache-maven-3.9.9-bin.tar.gz
    • (Optional) Create a symbolic link for convenient future version upgrades:
      sudo ln -s /opt/apache-maven-3.9.9 /opt/maven

    3. Configuring Environment Variables (M2_HOME & PATH)

    To execute mvn commands system-wide from any terminal location, configure your profile environment settings:

    • Create or edit a Maven environment profile script in /etc/profile.d/maven.sh:
      sudo nano /etc/profile.d/maven.sh
    • Add the following export statements into the file:
      export M2_HOME=/opt/maven
      export MAVEN_HOME=/opt/maven
      export PATH=${M2_HOME}/bin:${PATH}
    • Save the file and grant it executable permissions:
      sudo chmod +x /etc/profile.d/maven.sh
    • Reload the environment variables in your current session:
      source /etc/profile.d/maven.sh

    4. Testing and Verifying Maven Installation

    Validate that Maven is properly recognized by the Linux shell:

    • Run the version command:
      mvn -version
    • Expected Output: The terminal will print the installed Apache Maven version, Maven home directory, Java version, and Linux OS architecture details. Once visible, Maven is fully prepared to build your Java projects.

    📺 Explore More Related Tutorials

    Expand your Linux server administration and Java environment setup knowledge with these related tutorials from our channel:


    Click here to watch on YouTube:
    https://www.youtube.com/watch?v=zpOX8F_vW1k&list=UUhwKlOVR041tngjerWxVccw

    Click here to download Apache Maven:
    https://maven.apache.org/download.cgi


    Click here to watch in Youtube :
    https://www.youtube.com/watch?v=zpOX8F_vW1k&list=UUhwKlOVR041tngjerWxVccw

    Click here to download Apache Maven :

    http://maven.apache.org/

    http://maven.apache.org/download.cgi

    http://maven.apache.org/install.html


    Linux Commands:
    #wget http://apache.arvixe.com/maven/maven-3/3.3.3/binaries/apache-maven-3.3.3-bin.tar.gz
    
    #tar xvf apache-maven-3.3.3-bin.tar.gz
    
    #mvn –version
    

    Maven Path Setup:
    export M2_HOME=/opt/apache-maven-3.3.3
    export M2=$M2_HOME/bin
    export PATH=$M2:$PATH
    

    Click the below Image to Enlarge
    Apache Maven : Apache Maven Installation (Linux OS) 
    Apache Maven : Apache Maven Installation (Linux OS) 
    Apache Maven : Apache Maven Installation (Linux OS) 
    Apache Maven : Apache Maven Installation (Linux OS) 
    Apache Maven : Apache Maven Installation (Linux OS) 
    Apache Maven : Apache Maven Installation (Linux OS) 
    Apache Maven : Apache Maven Installation (Linux OS) 
    Apache Maven : Apache Maven Installation (Linux OS) 
    Apache Maven : Apache Maven Installation (Linux OS) 
    Apache Maven : Apache Maven Installation (Linux OS) 
    Apache Maven : Apache Maven Installation (Linux OS) 
    Apache Maven : Apache Maven Installation (Linux OS) 
    See also:

  • All JavaEE Viedos Playlist
  • All JavaEE Viedos
  • All JAVA EE Links
  • Servlets Tutorial
  • All Design Patterns Links
  • JDBC Tutorial
  • Java Collection Framework Tutorial
  • JAVA Tutorial
  • Newer Posts Older Posts Home

    Tutorials